Tuesday 23 July 2013

Create a xib file for ViewController Page


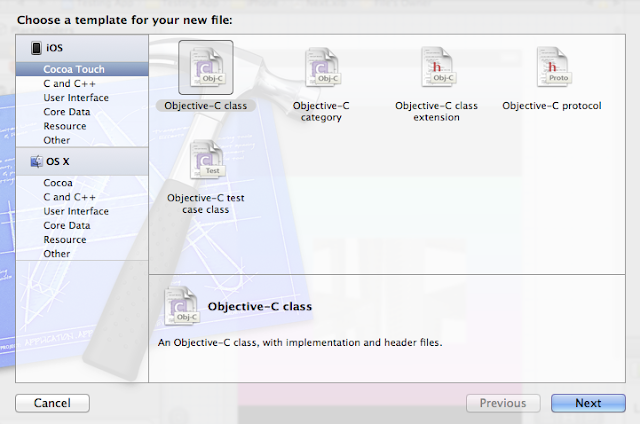
Step 1: Open Existing Project --> Right Click --> Choose New File.


Step 2: Choose UserInterface.

1. Before clicking userInterface Option

2. After clicking userInterface Option

Step 3:  UserInterface --> Choose View --> Click Next Button.


Step 4: Choose a Device Family Type --> Click Next Button.


Step 5: Enter FileName --> And Click the Create Button.

1. Before Creation xib page


2. After Creation xib page


Step 6: Click the created File --> Choose File Owner --> Click the Custom Class --> Enter the File Name.


Step 7: Choose File Owner --> Click the Connection Inspector --> view is mapped into View(xib page).

Connection Inspector


Step 8: Build And Run the Application --> The project file(XiB) is Worked.

Monday 10 June 2013

Tap Button to Show MenuController in Xcode

.h File:

@interface ViewController : UIViewController
{
    IBOutlet UIButton *btn1;
    IBOutlet UIButton *btn2;
    IBOutlet UIButton *btn3;
    IBOutlet UIButton *btn4;

    int btnnumber;
}

-(IBAction)btn1:(id)sender;
-(IBAction)btn2:(id)sender;
-(IBAction)btn3:(id)sender;
-(IBAction)btn4:(id)sender;

@end


.m File:

-(IBAction)btn1:(id)sender
{
    [self becomeFirstResponder];
    
    btnnumber = 1;
    
    UIMenuItem *menu1=[[UIMenuItem alloc]initWithTitle:@"Detail" action:@selector(Detail:)];
    UIMenuItem *menu2=[[UIMenuItem alloc]initWithTitle:@"Edit" action:@selector(Edit:)];
    UIMenuItem *menu3=[[UIMenuItem alloc]initWithTitle:@"Change Color" action:@selector(Color:)];
    UIMenuItem *menu4=[[UIMenuItem alloc]initWithTitle:@"Delete" action:@selector(Delete:)];
    UIMenuController *menu = [UIMenuController sharedMenuController];
    menu.menuItems=[NSArray arrayWithObjects:menu1,menu3,menu2,menu4, nil];
    [menu setTargetRect:CGRectMake(0, 0, 0, 0) inView:btn1];
    [menu setMenuVisible:YES animated:YES];
}

-(IBAction)btn2:(id)sender
{
    [self becomeFirstResponder];
    
    btnnumber = 2;
    
    UIMenuItem *menu1=[[UIMenuItem alloc]initWithTitle:@"Detail" action:@selector(Detail:)];
    UIMenuItem *menu2=[[UIMenuItem alloc]initWithTitle:@"Edit" action:@selector(Edit:)];
    UIMenuItem *menu3=[[UIMenuItem alloc]initWithTitle:@"Change Color" action:@selector(Color:)];
    UIMenuItem *menu4=[[UIMenuItem alloc]initWithTitle:@"Delete" action:@selector(Delete:)];
    UIMenuController *menu = [UIMenuController sharedMenuController];
    menu.menuItems=[NSArray arrayWithObjects:menu1,menu3,menu2,menu4, nil];
    [menu setTargetRect:CGRectMake(0, 0, 0, 0) inView:btn2];
    [menu setMenuVisible:YES animated:YES];
}

-(IBAction)btn3:(id)sender
{
    [self becomeFirstResponder];
    
    btnnumber = 3;
    
    UIMenuItem *menu1=[[UIMenuItem alloc]initWithTitle:@"Detail" action:@selector(Detail:)];
    UIMenuItem *menu2=[[UIMenuItem alloc]initWithTitle:@"Edit" action:@selector(Edit:)];
    UIMenuItem *menu3=[[UIMenuItem alloc]initWithTitle:@"Change Color" action:@selector(Color:)];
    UIMenuItem *menu4=[[UIMenuItem alloc]initWithTitle:@"Delete" action:@selector(Delete:)];
    UIMenuController *menu = [UIMenuController sharedMenuController];
    menu.menuItems=[NSArray arrayWithObjects:menu1,menu3,menu2,menu4, nil];
    [menu setTargetRect:CGRectMake(0, 0, 0, 0) inView:btn3];
    [menu setMenuVisible:YES animated:YES];
}

-(IBAction)btn4:(id)sender
{
    [self becomeFirstResponder];
    
    btnnumber = 4;
    
    UIMenuItem *menu1=[[UIMenuItem alloc]initWithTitle:@"Detail" action:@selector(Detail:)];
    UIMenuItem *menu2=[[UIMenuItem alloc]initWithTitle:@"Edit" action:@selector(Edit:)];
    UIMenuItem *menu3=[[UIMenuItem alloc]initWithTitle:@"Change Color" action:@selector(Color:)];
    UIMenuItem *menu4=[[UIMenuItem alloc]initWithTitle:@"Delete" action:@selector(Delete:)];
    UIMenuController *menu = [UIMenuController sharedMenuController];
    menu.menuItems=[NSArray arrayWithObjects:menu1,menu3,menu2,menu4, nil];
    [menu setTargetRect:CGRectMake(0, 0, 0, 0) inView:btn4];
    [menu setMenuVisible:YES animated:YES];
}

- (BOOL)canBecomeFirstResponder
{
    return YES;
}

-(void)Detail:(id)sender
{
    NSLog(@"Table Details");
    NSLog(@"%d",btnnumber);
}


-(void)Edit:(id)sender
{
    NSLog(@"Edit Table");
    NSLog(@"%d",btnnumber);
}


-(void)Color:(id)sender
{
    NSLog(@"Change Table Color");
    NSLog(@"%d",btnnumber);
    
    UIMenuItem *menu1=[[UIMenuItem alloc]initWithTitle:@"Default" action:@selector(Default:)];
    UIMenuItem *menu2=[[UIMenuItem alloc]initWithTitle:@"Red" action:@selector(Red:)];
    UIMenuItem *menu3=[[UIMenuItem alloc]initWithTitle:@"White" action:@selector(White:)];
    UIMenuItem *menu4=[[UIMenuItem alloc]initWithTitle:@"Yellow" action:@selector(Yellow:)];
    UIMenuController *menu = [UIMenuController sharedMenuController];
    menu.menuItems=[NSArray arrayWithObjects:menu1,menu3,menu2,menu4, nil];
    [menu setTargetRect:CGRectMake(0, 0, 0, 0) inView:btn1];
    [menu setMenuVisible:YES animated:YES];
}

-(void)Default:(id)sender
{
    NSLog(@"you have chossed default color");
}

-(void)Red:(id)sender
{
    NSLog(@"you have chossed Red color");
}

-(void)White:(id)sender
{
    NSLog(@"you have chossed White color");
}

-(void)Yellow:(id)sender
{
    NSLog(@"you have chossed Yellow color");
}

-(void)Delete:(id)sender
{
    NSLog(@"Delete Table");
    NSLog(@"%d",btnnumber);
    
}


xib File (Design):


OutPut:


Click the Btn1. Show the Options in MenuController

Click the change Color from Menu Controller


Choose the Color is White(Another MenuControler)


Click the Btn3. Show the Options Available in MenuController


Create a Apple ID for Free!!!

Steps for Creating Free Apple ID:

  1. Open the iTunes Application.

  2. Click the iTunes Store in iTunes Application

  3. In Bottom of the Page, Change the Country (Eg: Change the Country India to USA)

  4. Click and Download the free app in iTunes Store.

  5. In PopupWindow, Choose  "Create Apple ID".

  6. Continue --> Tick, I have read and agree to these Terms Conditions. --> Click the Agree Button.

  7. Enter the AppleID Details.(Email, Password, Security Questions, DOB etc). And Click Next Button.

  8. Select the Payment Option is None. And Enter the Billing Address. And Click the Create Apple ID.

---------------------------Successfully your Apple ID was Created!!!!!--------------------------------------

Monday 29 April 2013

Zoom IN & Zoom OUT using a View in XCode

Description:

This code can be used to Zoom In & Zoom Out options for View.


.h File:


@interface Zooming : UIViewController
{
    IBOutlet UIScrollView *scrollView;
 
    IBOutlet UIView *viewer;
}
@end


.m File:


- (void)viewDidLoad
{
    [super viewDidLoad];
 
    UIButton *add = [[UIButton alloc]init];
    add.frame = CGRectMake(10, 10, 100, 100);
    [add setTitle:@"add" forState:UIControlStateNormal];
    add.backgroundColor = [UIColor brownColor];
 
    UIButton *delete = [[UIButton alloc]init];
    delete.frame = CGRectMake(200, 200, 100, 100);
    [delete setTitle:@"delete" forState:UIControlStateNormal];
    delete.titleLabel.textColor = [UIColor blackColor];
    delete.backgroundColor = [UIColor greenColor];
 
    viewer = [[UIView alloc]initWithFrame:CGRectMake(0, 0, 1000, 1000)];
    [viewer addSubview:add];
    [viewer addSubview:delete];
 
    CGRect yFrame = CGRectMake(0.0, 0.0, 320, 410);
    scrollView = [[UIScrollView alloc] initWithFrame:yFrame];
    [scrollView setScrollEnabled:YES];
    [scrollView setBackgroundColor:[UIColor clearColor]];
    [scrollView setContentSize:CGSizeMake(1000, 1000)];
    scrollView.minimumZoomScale = 0.3;
    scrollView.maximumZoomScale = 2.0;
    scrollView.zoomScale = 0.3;
    [scrollView setZoomScale:scrollView.minimumZoomScale];
    scrollView.delegate = self;
    [scrollView addSubview:viewer];


    // For set a Zoom out the view
    //scrollView.zoomScale = 0.4;

 
    [self.view addSubview:scrollView];
    [self.view bringSubviewToFront:scrollView];
}

- (UIView *)viewForZoomingInScrollView:(UIScrollView *)scrollView
{
    return viewer;
}


Zoom IN & Zoom OUT using a Image in Xcode

Description:

This code can be used to Zoom In & Zoom Out options for images.


.h File:


@interface view : UIViewController
{
    IBOutlet UIScrollView *scrollView;
 
    IBOutlet UIImageView *imageView;
}
@end


.m File:


- (void)viewDidLoad
{
    [super viewDidLoad];
 
    UIImage *image = [UIImage imageNamed:@"demo.png"];
    imageView = [[UIImageView alloc] initWithFrame:CGRectMake(0.0, 0.0, image.size.width, image.size.height)];
    [imageView setImage:image];
 
    CGRect yFrame = CGRectMake(0.0, 0.0, 320, 432);
    scrollView = [[UIScrollView alloc] initWithFrame:yFrame];
    [scrollView setScrollEnabled:YES];
    [scrollView setBackgroundColor:[UIColor blackColor]];
    [scrollView setContentSize:CGSizeMake(image.size.width, image.size.height)];
    scrollView.minimumZoomScale = 0.4;
    scrollView.maximumZoomScale = 4.0;
    [scrollView setZoomScale:scrollView.minimumZoomScale];
    scrollView.delegate = self;
    [scrollView addSubview:imageView];

    // For set a Zoom out the image
    //scrollView.zoomScale = 0.4;

    [self.view addSubview:scrollView];
    [self.view bringSubviewToFront:scrollView];  
}


- (UIView *)viewForZoomingInScrollView:(UIScrollView *)scrollView
{
    return imageView;
}


Saturday 20 April 2013

Implement Code for Text file to Split the Values in XCode

  .h File:

        NSArray *state;
        NSArray *state;
        NSMutableArray *components;


  .m File:


     -(Void) ButtonCoding
     {
        NSString *Filename=@"StateList";

        NSString* path = [[NSBundle mainBundle] pathForResource:Filename
                                                         ofType:@"txt"];
        NSString* content = [NSString stringWithContentsOfFile:path
                                                      encoding:NSUTF8StringEncoding
                                                         error:NULL];
        
        NSArray *componet=[[NSMutableArray alloc]init];
        
        state=[[NSMutableArray alloc]init];
        
        componet = [content componentsSeparatedByString:@"|"];
        for(int k=0;k<[componet count]-1;k++)
        {
            NSString *name1 = [componet objectAtIndex:k];
            [state addObject:name1];
        }
        
        [table2 reloadData];
     }


- (NSInteger)numberOfSectionsInTableView:(UITableView *)tableView
{
    if(tableView == self.tabel1
    {
        return 1;
    }
    else if(tableView == self.tabel2
    {
        return 1;
    }  
}

- (NSInteger)tableView:(UITableView *)tableView numberOfRowsInSection:(NSInteger)section
{
    #warning Incomplete method implementation.
    // Return the number of rows in the section.
    if (tableView == self.tabel1
    {
        return [city count];
    }
    
    else if (tableView == self.tabel2
    {
        return [state count];
    }
}


- (UITableViewCell *)tableView:(UITableView *)tableView cellForRowAtIndexPath:(NSIndexPath *)indexPath
{
    static NSString *CellIdentifier = @"Cell";
    
    UITableViewCell *cell = [tableView dequeueReusableCellWithIdentifier:CellIdentifier];
    if (cell == nil) {
        cell = [[[UITableViewCell alloc] initWithStyle:UITableViewCellStyleDefault reuseIdentifier:CellIdentifier] autorelease];
    }
    
    if(tableView == self.tabel1
    {
        NSString *cellValue1 = [city objectAtIndex:indexPath.row];
        cell.text = cellValue1;
    }
    else if(tableView == self.tabel2)
    {
        NSString *cellValue2 = [state objectAtIndex:indexPath.row];
        cell.text = cellValue2;
    }
    return cell;
}

- (void)tableView:(UITableView *)tableView didSelectRowAtIndexPath:(NSIndexPath *)indexPath
{
    if (tableView == self.tabel1
    {
        NSString *CitySelected = [city objectAtIndex:indexPath.row];
        txt1.text=CitySelected;
        tabel1.hidden=YES;
    }
    
    else if (tableView == self.tabel2
    {
        NSString *StateSelected = [state objectAtIndex:indexPath.row];
        txt2.text=StateSelected;
        tabel2.hidden=YES;
    }
}

Define and Move the Objects in Xcode

Step 1: Create a Project.

Step 2: Add the images into your project.

Step 3: In .h File Add the Codings are,

#import <UIKit/UIKit.h>

@interface Touchviewcontroller : UIViewController
{
    
}

-(IBAction)handlePan:(UIPanGestureRecognizer *)recognizer;

@end

Step 4: In .m File Add the Codings are,

-(IBAction)handlePan:(UIPanGestureRecognizer *)recognizer
{
    CGPoint translation = [recognizer translationInView:self.view];
    recognizer.view.center = CGPointMake(recognizer.view.center.x + translation.x,
                                         recognizer.view.center.y + translation.y);
    [recognizer setTranslation:CGPointMake(00inView:self.view];
}

Step 5: In Xib File (Design)

  * Create a Image View  and  assign the image.

  * PanGestureRecognizer drag&drop to Image View.
  
  * FileOwner --> Outlets --> Map the handlePan to PanGestureRecognizer.


Step 7: Build and Run the application. You can Select and move objects.


Move the Objects in XCode (Programatically)

Step 1: Create a Project.

Step 2: Add the images into your project.

Step 3: In .h File Add the Codings are,

#import <UIKit/UIKit.h>

@interface Touchviewcontroller : UIViewController
{
    
}

-(IBAction)create_obj:(id)sender;

-(IBAction)handlePan:(UIPanGestureRecognizer *)recognizer;

@end

Step 4: In .m File Add the Codings are,

-(IBAction)create_obj:(id)sender
{
    UIImageView *img = [[UIImageView alloc]initWithImage:[UIImage imageNamed:@"arrow.png"]];
    img.frame=CGRectMake(arc4random()%298, arc4random()%448, 60, 60);
    [img setUserInteractionEnabled:YES];

    [self.view addSubview:img];
 
    //For ScrollView
    //[ScrollView addSubview:img];
    
    UIPanGestureRecognizer *panRecognizer = [[UIPanGestureRecognizer alloc]initWithTarget:self action:@selector(handlePan:)];
    [panRecognizer setMinimumNumberOfTouches:1];
    [panRecognizer setMaximumNumberOfTouches:1];
    [img setUserInteractionEnabled:YES];
    [img addGestureRecognizer:panRecognizer];
    
}

-(IBAction)handlePan:(UIPanGestureRecognizer *)recognizer
{
    CGPoint translation = [recognizer translationInView:self.view];
    recognizer.view.center = CGPointMake(recognizer.view.center.x + translation.x,
                                         recognizer.view.center.y + translation.y);
    [recognizer setTranslation:CGPointMake(0, 0) inView:self.view];
}

Step 5: In Xib File(Design)


Step 6: Map the Create_obj to CreateObjects BarButton

Step 7: Build and Run the application.

                                                                        After Clicking Create Objects Button 


Thursday 18 April 2013

Snapshot a View and Attach the image into Mail for Xcode

Add the Frameworks :   MessageUI.framework & QuartzCore.framework

.h File:
#import <QuartzCore/QuartzCore.h>
#import <MessageUI/MessageUI.h>

.m File:

-(void)Button
{
    
    myScrollView.backgroundColor= [UIColor colorWithPatternImage:[UIImage imageNamed:@"background123.png"]];
    
    UIImage *image;
    UIGraphicsBeginImageContext(myScrollView.contentSize);
    {
        CGPoint savedContentOffset = myScrollView.contentOffset;
        CGRect savedFrame = myScrollView.frame;
        myScrollView.contentOffset = CGPointZero;
        myScrollView.frame = CGRectMake(00myScrollView.contentSize.width,  myScrollView.contentSize.height);
        
        [myScrollView.layer renderInContextUIGraphicsGetCurrentContext()];
        image = UIGraphicsGetImageFromCurrentImageContext();
        
        myScrollView.contentOffset = savedContentOffset;
        myScrollView.frame = savedFrame;
    }
    
    UIGraphicsEndImageContext();
   //Save Image to Local Library
    UIImageWriteToSavedPhotosAlbum(image, self, @selector(image:didFinishSavingWithError:contextInfo:), nil);
    
    //Attach a Email Process
    NSData * imageData = UIImageJPEGRepresentation(image, 1.0);
    
    
    if ( [MFMailComposeViewController canSendMail] ) 
    {
        MFMailComposeViewController *mailComposer = [[[MFMailComposeViewController allocinitautorelease];
       mailComposer.mailComposeDelegate = self;
        [mailComposer addAttachmentData:imageData mimeType:@"image/jpeg" fileName:@"SeatChart.jpg"];
        [mailComposer setSubject:@"Seating Chart"];
       
        
        /* Configure other settings */
        
        [self presentModalViewController:mailComposer animated:YES];
        //[mailComposer release];
    }
    else
    {
        UIAlertView* alert=[[UIAlertView alloc]initWithTitle:@"No Mail Accounts" message:@"Please set up a Mail account in order to send email." delegate:self cancelButtonTitle:@"OK" otherButtonTitles:nil];
        [alert show];
    }   
}


- (void)image:(UIImage *)image didFinishSavingWithError:(NSError *)error contextInfo:(void *)contextInfo
{
    UIAlertView *alert;
    if (error)
    {
        alert = [[UIAlertView alloc] initWithTitle:@"Error"
                                           message:@"Unable to save image to Photo Album."
                                          delegate:self cancelButtonTitle:@"Ok"
                                 otherButtonTitles:nil];
    }
    else
    {
        alert = [[UIAlertView alloc] initWithTitle:@"Success"
                                           message:@"Image saved to Photo Album."
                                          delegate:self cancelButtonTitle:@"Ok"
                                 otherButtonTitles:nil];
    }
    [alert show];

}


- (void) mailComposeController:(MFMailComposeViewController *)controller didFinishWithResult:(MFMailComposeResult)result error:(NSError *)error
{
    UIAlertView *Alert;
    switch (result)
    {

        case MFMailComposeResultCancelled:
            NSLog(@"Mail cancelled");
            Alert = [[UIAlertView alloc]initWithTitle:@"Message" message:@"E-Mail Cancelled" delegate:self cancelButtonTitle:@"OK" otherButtonTitles:nilnil];
            [Alert show];
            break;

        case MFMailComposeResultSaved:
            NSLog(@"Mail saved");
            Alert = [[UIAlertView alloc]initWithTitle:@"Message" message:@"E-Mail Saved" delegate:self cancelButtonTitle:@"OK" otherButtonTitles:nilnil];
            [Alert show];
            break;

        case MFMailComposeResultSent:
            NSLog(@"Mail sent");
            Alert = [[UIAlertView alloc]initWithTitle:@"Message" message:@"E-Mail Sent" delegate:self cancelButtonTitle:@"OK" otherButtonTitles:nilnil];
            [Alert show];
            break;

        case MFMailComposeResultFailed:
            NSLog(@"Mail sent failure: %@", [error localizedDescription]);
            Alert = [[UIAlertView alloc]initWithTitle:@"Message" message:@"E-Mail Sending Failed" delegate:self cancelButtonTitle:@"OK" otherButtonTitles:nilnil];
            [Alert show];
            break;

        default:
            break;
    }
    
    // Close the Mail Interface
    [self dismissViewControllerAnimated:YES completion:NULL];

}

Snapshot a View and Attach the image into Mail (View Only) for Xcode

Add the Frameworks :   MessageUI.framework & QuartzCore.framework

.h File:
#import <QuartzCore/QuartzCore.h>
#import <MessageUI/MessageUI.h>

.m File:


-(void)Button
{
    
    myScrollView.backgroundColor= [UIColor colorWithPatternImage:[UIImage imageNamed:@"background123.png"]];
    
    UIGraphicsBeginImageContext(self.view.frame.size);
    [self.view.layer renderInContext:UIGraphicsGetCurrentContext()];
    UIImage * image = UIGraphicsGetImageFromCurrentImageContext();
    UIGraphicsEndImageContext();

    
    //Save Image to Local Library
    UIImageWriteToSavedPhotosAlbum(image, self, @selector(image:didFinishSavingWithError:contextInfo:), nil);


    //Attach a Email Process
    UIImageWriteToSavedPhotosAlbum(image, nilnilnil);
    
    NSData * imageData = UIImageJPEGRepresentation(image, 1.0);
    
    
    if ( [MFMailComposeViewController canSendMail] ) 
    {
        MFMailComposeViewController *mailComposer = [[[MFMailComposeViewController allocinitautorelease];
       mailComposer.mailComposeDelegate = self;
        [mailComposer addAttachmentData:imageData mimeType:@"image/jpeg" fileName:@"SeatChart.jpg"];
        [mailComposer setSubject:@"Seating Chart"];
       
        
        /* Configure other settings */
        
        [self presentModalViewController:mailComposer animated:YES];
        //[mailComposer release];
    }   
}


- (void)image:(UIImage *)image didFinishSavingWithError:(NSError *)error contextInfo:(void *)contextInfo
{
    UIAlertView *alert;
    if (error)
    {
        alert = [[UIAlertView alloc] initWithTitle:@"Error"
                                           message:@"Unable to save image to Photo Album."
                                          delegate:self cancelButtonTitle:@"Ok"
                                 otherButtonTitles:nil];
    }
    else
    {
        alert = [[UIAlertView alloc] initWithTitle:@"Success"
                                           message:@"Image saved to Photo Album."
                                          delegate:self cancelButtonTitle:@"Ok"
                                 otherButtonTitles:nil];
    }
    [alert show];

}


- (void) mailComposeController:(MFMailComposeViewController *)controller didFinishWithResult:(MFMailComposeResult)result error:(NSError *)error
{
    UIAlertView *Alert;
    switch (result)
    {

        case MFMailComposeResultCancelled:
            NSLog(@"Mail cancelled");
            Alert = [[UIAlertView alloc]initWithTitle:@"Message" message:@"E-Mail Cancelled" delegate:self cancelButtonTitle:@"OK" otherButtonTitles:nil, nil];
            [Alert show];
            break;

        case MFMailComposeResultSaved:
            NSLog(@"Mail saved");
            Alert = [[UIAlertView alloc]initWithTitle:@"Message" message:@"E-Mail Saved" delegate:self cancelButtonTitle:@"OK" otherButtonTitles:nil, nil];
            [Alert show];
            break;

        case MFMailComposeResultSent:
            NSLog(@"Mail sent");
            Alert = [[UIAlertView alloc]initWithTitle:@"Message" message:@"E-Mail Sent" delegate:self cancelButtonTitle:@"OK" otherButtonTitles:nil, nil];
            [Alert show];
            break;

        case MFMailComposeResultFailed:
            NSLog(@"Mail sent failure: %@", [error localizedDescription]);
            Alert = [[UIAlertView alloc]initWithTitle:@"Message" message:@"E-Mail Sending Failed" delegate:self cancelButtonTitle:@"OK" otherButtonTitles:nil, nil];
            [Alert show];
            break;

        default:
            break;
    }
    
    // Close the Mail Interface
    [self dismissViewControllerAnimated:YES completion:NULL];

}